Global payments for e-commerce

Instant Bank Transfers
With Pay by Bank, you get instant confirmation and deliver without waiting.

Real-time confirmation

Direct-to-bank payments

Always-on payment processing
Avoid chargebacks

Chargeback-resistant by design

SCA & PSD2 compliance

Cleaner fraud profile
Reduce Fees

No card network fees
Lower failed payment rates

Built for high-risk businesses
Testimonials
Get started in just 4 steps
Fill out a short pre-check form
Get your custom offer
Pass verification
Integrate and go live
Frequently asked questions
What account types do you have, and what documents are required?
You can create and verify a merchant account for a company or an individual entrepreneur.
Once the pre-check application is approved, your account manager or sales manager will provide you with the required details needed to complete the verification.
Below, you can check the documents required for company and individual entrepreneur registration.
For the company:
- Certificate of Incorporation;
- Beneficiary's passport and proof of residence address;
- Register of Directors;
- Passport and proof of residence for each Director;
- Register of Shareholders;
- Passport and proof of residence for each Shareholder;
- Certificate of Good Standing/Certificate of Incumbency/Extract from register/issued within three months (in case legal entity was registered more than two years ago);
- Memorandum & Articles of Association/Constitution/Statute/other statutory documents;
- If the project is Betting, Gambling, Crypto, Forex:
- Activity License;
- Payment Agent Agreement (if applicable).
For individual entrepreneurs:
- An official document from the state registration that shows you as a sole proprietor;
- Tax registration confirmation of a private entrepreneur;
- Passport (driver`s license/international passport/ID card);
- Proof of residence address.
Please remember that all the mentioned documents must be in English or with a certified translation.
The proof of residence has to be issued within three months.
What are the website requirements to get a merchant account?
To receive a merchant account and the ability to accept online payments, each website must meet certain criteria.
This includes the availability of:
1.The logos of the payment systems whose payments you will accept.
2.Contact us page.
3.Information about the company. The website must indicate the official name of the company, its address, and the country in which the merchant's main business entity is registered. This information helps companies gain consumer confidence and must be indicated on the checkout or payment data entry pages.
4.Terms of delivery. When selling goods online, you must provide detailed information about the delivery time of the goods.
5.A detailed description of goods and services. Make sure the offered product matches the description on the website.
6.Privacy Policy, Return & Cancellation Policy.
7.SSL certificate.
How to install WordPress plugin?
The Payop WordPress plugin is a tool for accepting online payments on your WordPress website, integrated with the popular e-commerce platform WooCommerce. This plugin equips your website to receive payments from customers using various payment methods. It's important to note that Payop functions as a plugin embedded within WooCommerce, simplifying the process of integrating payment capabilities into your online store.
Installation from WordPress Plugin Store:
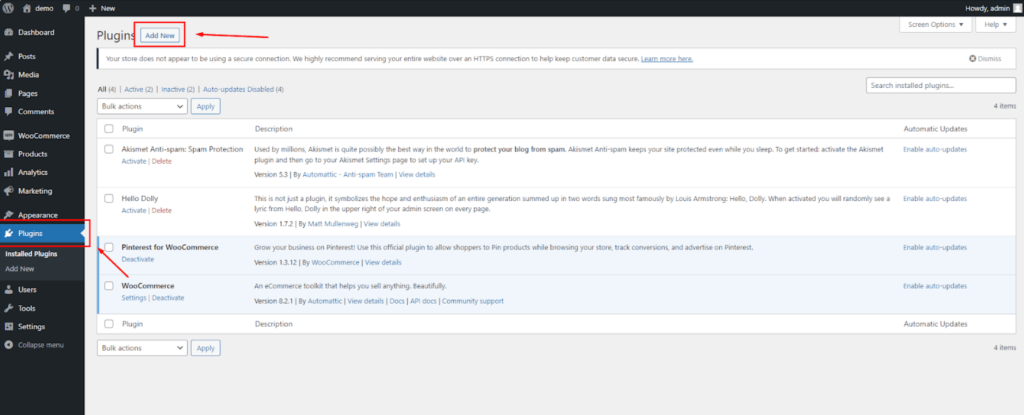
1.Open the WordPress admin panel and go to the "Plugins" section.
2.Click on "Add New."

3.In the search bar, type "Payop."
4.Click "Install."
5.After installation, click "Activate."
Manual Installation:
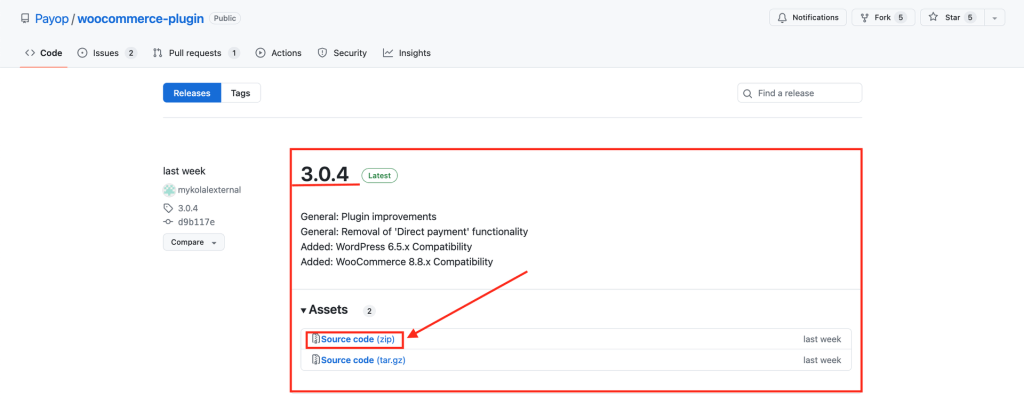
1.Go to the Payop plugin page.
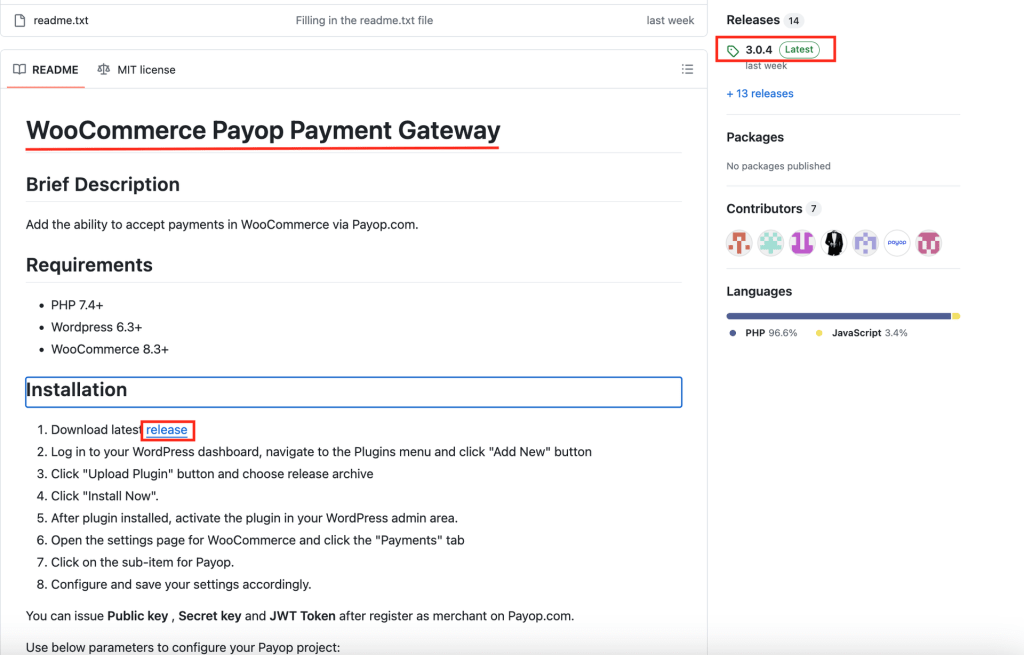
2.Download the latest version of the plugin in .zip format.
3.Open the WordPress admin panel and go to the "Plugins" section.
4.Click "Add New."
5.After that, click "Upload Plugin" and select the downloaded .zip file.
6.Click "Install" and then "Activate."

Configuring the Payop Plugin in WooCommerce
Configuring the Payop Plugin in WooCommerce:
1.Ensure the Payop plugin is activated on your WordPress website. If it's not already active, follow these steps:
- Open your WordPress admin panel.
- Navigate to the "Plugins" section.
- Look for the Payop plugin and click "Activate" if it's listed but inactive.
2.Access WooCommerce Settings. In your WordPress admin panel, go to the WooCommerce settings to configure the Payop payment gateway:
- Click on "WooCommerce" in the left-hand menu.
- Click on the `Settings` button.
3.Navigate to the "Payments" tab. Within the WooCommerce settings, select the "Payments" tab. This is where you can manage all payment-related configurations for your online store.
4.Locate the Payop Payment Option and Configure:
- Scroll down to find the option related to Payop among the available payment methods. You should see "Payop" or the name you specified in the "Name of payment gateway" field when setting up the plugin.
- Click on the Payop option to access the plugin's settings. This is where you will configure the details required for Payop payments to function correctly.
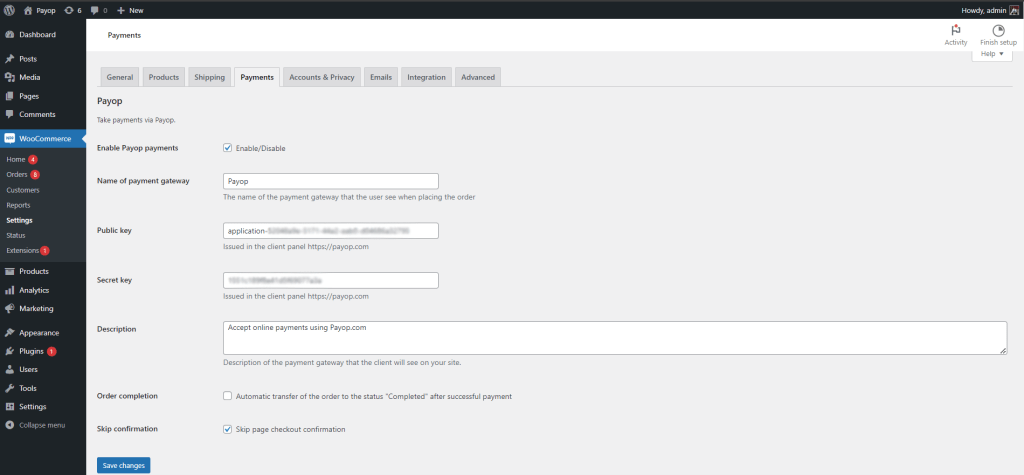
- Fill in the required Public key and Secret key fields.
- Name of payment gateway. In this field, you can specify the name customers will see at the checkout when choosing the Payop option to pay for an order.
- Description. In this field, you can briefly describe the payment gateway, which will be visible to customers on your website. It helps customers understand that they can use Payop for online payments.
- Automatic transfer of the order to the status "Completed" after successful payment. Enabling this option will automatically change the order status to "Completed" once a successful payment is made via Payop.
- Skip page checkout confirmation. If enabled, this option allows you to skip the confirmation page during the checkout process, streamlining the payment process for customers.
- Payment form language. This setting enables you to select the language for the payment form displayed on your website. Choose the language that best suits your customers.
- Save Your Settings. After entering the necessary information, make sure to save your settings within the Payop plugin. You will typically find a "Save" or "Update" button at the bottom or top of the plugin settings page. Click on it to save your configurations.
By following these steps, you have successfully configured the Payop plugin within WooCommerce on your WordPress website. This will allow your online store to accept online payments using Payop as a payment gateway.
Please check the video instruction by following the link.
How can I test payment method integration and payment notifications?
Unfortunately, we currently do not have any sandbox or test environment. We hope these features will be available soon.
To test your integration, you can make a live payment, indicating a minimum amount possible to receive a successful transaction or cancel the transaction when entering the payment details. In this case, you will receive a notification about the payment cancellation.
If a transaction is successful or failed, you should receive an IPN callback to the IPN URL, which has been indicated in the IPN section of the Payop admin panel.
You can test your IPN URL using Postman (or any other API testing environment).
To do so, we recommend you send a POST request indicating your IPN URL as an endpoint.
An empty JSON object or example IPN callback can be indicated in the request body to troubleshoot your IPN URL service.
If you made a live payment, you can contact our support team via Tickets. They will resend an IPN callback and assist with troubleshooting your IPN URL service.