All
Withdrawal methods fall into two categories:
Settlements: The payment methods that allow you to withdraw funds to accounts registered under your business name or your company's pooled accounts. Settlements require prior verification of the recipients' details (documents confirming that the accounts belong to your company).
Payouts: The payment methods that allow you to withdraw funds to external accounts not registered under your business name. They enable single and bulk operations through the API and do not require the prior verification of the recipient's details to confirm account ownership.
You can create and verify a merchant account for a company or an individual entrepreneur.
Once the pre-check application is approved, your account manager or sales manager will provide you with the required details needed to complete the verification.
Below, you can check the documents required for company and individual entrepreneur registration.
For the company:
- Certificate of Incorporation;
- Beneficiary's passport and proof of residence address;
- Register of Directors;
- Passport and proof of residence for each Director;
- Register of Shareholders;
- Passport and proof of residence for each Shareholder;
- Certificate of Good Standing/Certificate of Incumbency/Extract from register/issued within three months (in case legal entity was registered more than two years ago);
- Memorandum & Articles of Association/Constitution/Statute/other statutory documents;
- If the project is Betting, Gambling, Crypto, Forex:
- Activity License;
- Payment Agent Agreement (if applicable).
For individual entrepreneurs:
- An official document from the state registration that shows you as a sole proprietor;
- Tax registration confirmation of a private entrepreneur;
- Passport (driver`s license/international passport/ID card);
- Proof of residence address.
Please remember that all the mentioned documents must be in English or with a certified translation.
The proof of residence has to be issued within three months.
There are the following statuses for the checkout payments in our system:
- New - the status is assigned when a payer initiates a transaction on the Payop checkout page by clicking on the `Confirm & Pay` button, regardless of whether they have completed the payment process afterwards.
- Accepted - the transaction has been successful. Payop has received the payment, and the funds have been credited to the merchant account.
- Failed - the transaction has been declined because the payer hasn`t paid for the order, or due to technical reasons.
- Timeout - the status is set for a transaction that has been declined due to exceeding the time frame it can be in a certain status. If the payment period for this transaction has expired, it will be automatically rejected.
For payments via Pay by Bank channels, there are three additional statuses with the following meanings:
- Pending -a transaction gets this status when, due to the lack of data, it cannot be directly transferred to the bank, and a payer should fill in the remaining information. It only occurs for payments via Direct integration.
- Pre-approved - we received technical confirmation that the payer's bank has approved the transaction, but the money has not yet been credited to the Payop account. When the transaction is Pre-approved, we expect to receive payment, but it`s not guaranteed by Payop till it gets the Accepted status. In this case, you, as a merchant, have the option to release the purchased item at your discretion. However, be warned that Payop doesn`t guarantee crediting of this payment, and if you don't want to take the risk, please treat this status as Awaiting Confirmation.
*the transaction may still be declined after Pre-approved status.
- Rejected - a payment has been automatically declined due to security reasons.
There are two main options for integrating our payment solutions into your website: using API or CMS plugins (WooCommerce, WordPress, Opencart).
To check the relevant information for each connection type, please refer to our Documentation.
If you have any questions or need assistance with integration, please contact our technical support via Tickets or at support@payop.com. Our team will help with your issue or guide you on where to check the information.
If you want to change your password, please follow the next steps:
1.Go to the Settings sections of your merchant dashboard.
2.Enter your new password and click the Save button.
3.To complete the action you will need to confirm your request via 2-factor authentication.
The security of our merchants' data is a high-priority for our team, therefore the account email address can only be changed through a request in the admin panel using Tickets.
Please create a Ticket, provide all the necessary information and we will send you the instruction to follow.
According to our privacy policy, only authorized employees have access to the client`s personal information. Such employees undertake the duty to strictly observe confidentiality and prevent unauthorized access of third parties to personal information and other clients` data. When an EU/EEA-based user/customer purchases the products/services through our website, we will be their Data Processor and Controller, in accordance with the GDPR.
If clients terminate their accounts, we will remove their personal information. However, there are exceptions to the `right to be forgotten`. For instance, when it comes to our services, we must keep track of who is involved in transactions to be able to prevent money laundering and criminal activity. We also need to keep track of transactions in order to support clients if any issues arise. Certain legal obligations prevent us from immediately deleting parts of your data. These obligations derive from accounting and tax laws, banking and anti-money laundering laws, but also consumer rights laws.
1.Go to the Request settlement page.
2.Select one of the withdrawal methods.
3.Choose a verified recipient from the list on the Recipient tab.
4.On the Amount tab, specify the following information:
-Transfer from: the balance from which you want to withdraw funds.
-Transfer amount.
-Withdrawal currency (for withdrawal via Bank Transfer, the currency specified during recipient verification is displayed).
-You can see the withdrawal fee amount and the total amount withdrawn from the balance, including the fee and currency exchange rate if the balance currency differs from the withdrawal currency.
5.Then click the Next button.
6.Check and, if necessary, edit the withdrawal information on the Confirmation tab.
7.Confirm the withdrawal by clicking the Create withdrawal button.
You need to go to the Request settlement page and select one of the available withdrawal methods from the list. The information required for the recipient verification depends on the selected method.
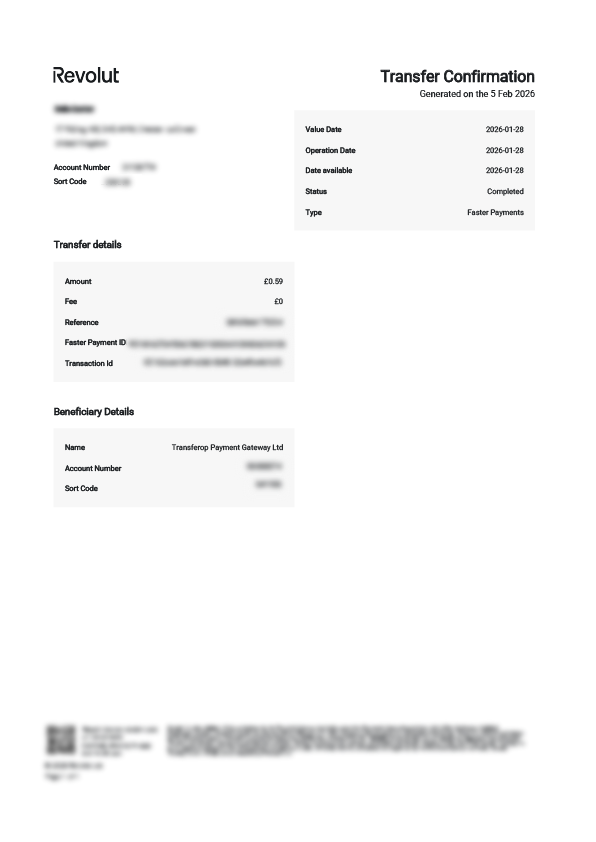
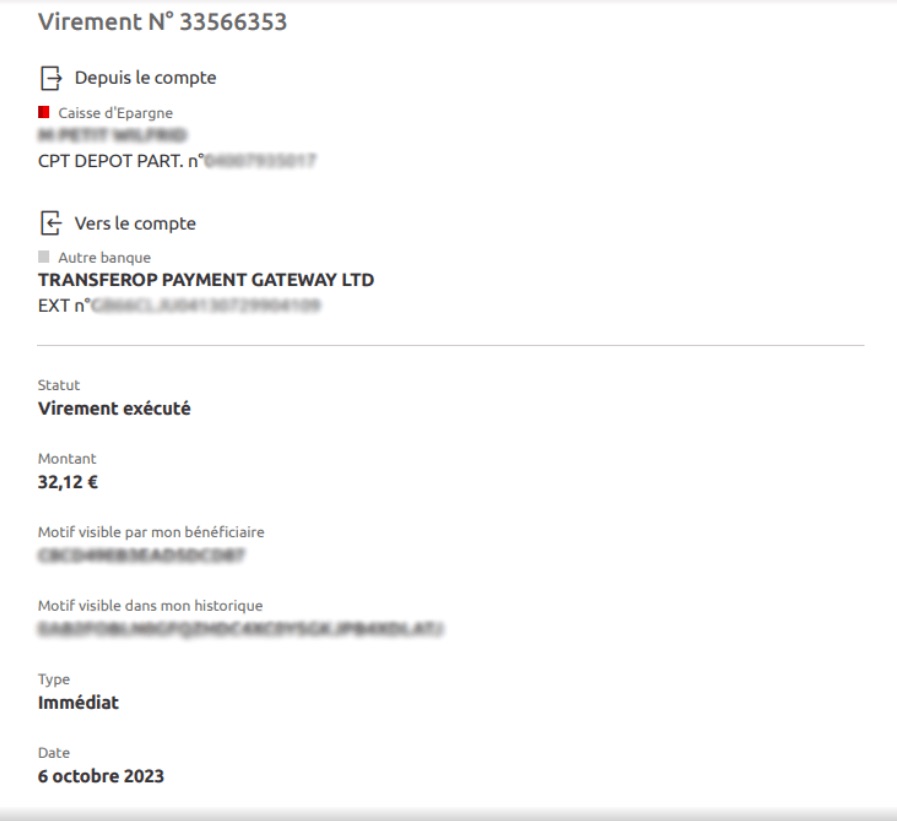
You made a payment on the website using the Pay by Bank, Pay by Revolut, or Pay by Monzo channels developed by Payop. The website integrated this channel to collect payments online.

Transferop Payment Gateway is our business entity, our trading name is Payop - that's why you see it on your bank statement. We built Pay by Bank payment collection through partnerships with banks and technical providers. It's a secure payment collection service made through Open Banking technology. The European Union engages all banks to join the Open Banking community.
We hope that your payment experience was smooth and fast. If not, please feel free to share with us the errors you might receive during the payment process, and we will contact your bank and ask to fix them. Payop actively participates in Open Banking development and adoption, and we see great potential in it.
1.Go to the Request settlement page.
2.Select the Bank Transfer method.
3.On the Recipient tab, click the Add New button. You will then be redirected to the recipient creation form.
4.On the Recipient information tab, you must specify the following information: Recipient bank country, Recipient currency, Recipient IBAN or Account number, Bank name, Bank address, and Type of account.
5.Then click the Next button.
6.On the Recipient address tab, you need to specify the following information: Country of business incorporation, Province/District/Country of business incorporation, City of business incorporation, Address of business incorporation, and ZIP code. If the Pooled account type is selected at the Recipient information stage, it is necessary to specify the Recipient company name.
7.Then click the Next button.
8.On the Documents tab, you must provide one of the following documents confirming that the specified details belong to your company: Bank statement or Bank Confirmation Letter.
9.Then click the Next button.
10.You can view and edit all information previously specified on the Confirmation tab. You can also provide additional information for Payment reference if necessary.
11.To send the recipient`s details for verification, click the Send for verification button. You will then receive an email confirming that your application is under review.
Please note that you cannot specify a country that Payop does not co-operate with. You can see the list of prohibited countries, regions, and SWIFT codes by clicking the Prohibited jurisdictions button.
Type of account:
- Own account – a direct and exclusive bank account established under the name and governance of your entity.
- Pooled account – a shared account managed by a third party that holds multiple entities` funds, with separate accounting records defining each entity`s balance sheet.
You must provide one of the following documents:
Bank statement: You can usually get a bank statement via Internet banking or by making an individual request to your bank. The Bank statement must provide the following information:
- For Own accounts: the merchant company's name, address, IBAN/account number, and the bank name/logo.
- For Pooled accounts: the account holder`s name, address, IBAN/account number, merchant company`s name as the originator of the transaction, and the details of the financial institution (the company's letterhead).
Bank Confirmation Letter is a certified bank letter issued by the bank to prove your ownership of the account. The letter can be requested in person at a bank branch, by email or phone, or, depending on the financial institution, through its online platform. It must meet the following requirements:
- For Own accounts: be signed or stamped by the bank, contain the name or logo of the bank, and confirm the merchant company's name, address, and IBAN/account number.
- For Pooled accounts: be signed or stamped by the bank, contain the name or logo of the bank, and confirm the account holder`s name, address, IBAN/account number, as well as your company`s name as the originator of the transaction.
Go to the Request settlement page;
Choose a payment method from the list of available ones: PayDo, Payoneer, or other;
On the Recipient tab, click the Add New button. You will then be redirected to the recipient creation form, which may differ depending on the selected payment method;
On the Recipient information tab, you must specify the following information: Template name and Recipient's details;
Then click the Next button;
On the Documents tab, you must provide documents confirming that the specified recipient details belong to your company. The type of document depends on the selected payment method;
You can view and edit all information previously specified on the Confirmation tab;
To send the recipient`s details for verification, click the Send for verification button. You will then receive an email confirming that your application is under review.
The recipient`s details depend on the selected payment method:
For PayDo: The PayDo user ID or email to which your PayDo business account is registered, and proof of account ownership. To get the proof:
Sign in to your PayDo account;
Navigate to the `Account details` tab;
Click on the `All available Account details` section;
Choose any desired account;
Click on `Download PDF`.
For Payoneer: Confirmation of your Payoneer receiving account that shows the account holder's name and address.
Go to the Request settlement page. Select one of the withdrawal methods. You will be then redirected to the Recipient tab, where you can find the lists of recipients divided by status:
- Verified: the recipient details are verified and can be used for withdrawals.
- In review: the recipient is in the process of verification.
- Rejected: the recipient details have not been verified and cannot be used for withdrawals.
You can edit recipient details by clicking the three dots next to the recipient you want to update and selecting Edit.
If the chosen recipient is in the Rejected section, they`ll be automatically resent to the relevant team for verification and moved to the In review section until our team approves or rejects them.
If you change the Accepted recipient, they`ll also be set to In review once you add new details and submit the update. Until our team approves the recipient and sets the Accepted status, these payment details won't be available for funds withdrawal.
If the recipient fails verification, we will send you an email indicating the reason. You can then make the necessary changes to your application or submit a new one.
Scheduled settlements are the option that allows you to automate the withdrawal process by setting up certain conditions, like frequency, amount, and method for a planned payment.
There are two settlement types:
- of a specific amount - if you want to withdraw only a certain amount from one of your Available balances;
- of the total amount - when all available funds will be withdrawn to a specified recipient.
Possible settlements frequency:
- Bi-weekly - such withdrawals will be initiated twice a week, on Monday and Wednesday;
- Weekly - when the settlement is automatically created on a fixed day of the week (Monday-Friday);
- Monthly - the withdrawal is initiated once a month.
How to create scheduled settlements?
1.In the Withdrawals section of your merchant panel, select the Scheduled settlements option and click the Add new button.
2.Select the payment method and the verified recipient (or template).
If you do not yet have the verified recipient, please create one and submit the required information. Our team will review your request as soon as possible, and if the recipient is verified, you will be able to proceed with the scheduled settlements.
3.Choose Custom amount or All amount and payment frequency.
4.Specify the balance you want to withdraw from, indicate the required amount (if you`ve chosen the Custom amount option), and transfer currency.
Please consider the selected method`s minimum and maximum limits when indicating the payment amount.
5.Press Next.
6.Review the settlement details and edit if needed.
7.Click Save settings to save the planned settlement.
Please check the video instruction by following the link.
1.Go to the Request payout page.
2.Select one of the withdrawal methods.
3.Create a new recipient or select one from the list. A newly created recipient will be automatically saved after confirming the withdrawal.
4.On the Amount tab specify the following information:
- Transfer from: the balance from which you want to withdraw funds.
- Transfer amount.
- Withdrawal currency.
- You can see the withdrawal fee amount and the total amount withdrawn from the balance, including the fee and currency exchange rate if the balance currency differs from the withdrawal currency.
- Payment reference (required field).
5.Then click the Next button.
6.Check and, if necessary, edit the withdrawal information on the Confirmation tab.
7.Confirm the withdrawal by clicking the Create withdrawal button.
Payop is an international payment service provider for various industries worldwide. We help businesses accept payments on their websites by processing transactions from their clients, no matter where they are or what payment method they use.
Payop is available in more than 170 countries and a wide range of payment methods, including international and local cards, bank transfers, internet banking, E-wallets, prepayment, mobile payments and cash. Payop is now available in Europe, North America, Latin America, MENA countries, Asia, the Pacific and other regions.
Merchants can integrate the Payop payment solutions within a few hours using API or our tailor-made plugins.
Each merchant can choose from several withdrawal methods, such as bank transfers (SEPA, SWIFT), e-Wallet (PayDo), crypto, and other services, depending on the client`s business model.
Below, you`ll find what our support can help you with, as well as which requests are beyond our scope and need to be handled by the merchant.
What can Payop support help me with?
You can contact our support to check the status of your payment if it was processed through Payop. In this case, you`ll see Transferop Payment Gateway or Payop in your bank statement.
Additionally, when you make a payment, you`ll receive an email from support@payop.com confirming that it was initiated and containing a link to track the status in real-time.
That link is always up to date, so you can monitor your payment anytime.
Which questions should I contact the merchant about?
Please contact the website where you made your purchase if your question is related to their products, services, or your account on their platform.
Payop only processes payments – we don`t manage user accounts, deliveries, or website functions.
You should contact the merchant if you want to ask about:
KYC procedures on the merchant`s website (data verification, additional info request, document acceptance)
Products or services, including delivery time, product access, etc
Account issues on the merchant`s website, such as login problems, forgotten passwords, or account verification
Bonuses or rewards offered by the merchant, for example, `How do I get my bonus?` or `Why wasn`t it added?`
Withdrawals from your account
Payments made through another payment system, not through Payop
Returns or refunds if the product didn`t meet your expectations or you want to cancel an order
Our mass payout solution using PayDo eWallet method allows you to make hundreds of payments simultaneously and automate payments to employees, users or partners in just a few clicks. The recipients just need to register a PayDo account and complete a short verification procedure. Once the funds are credited to the PayDo account, the user may:
- spend these funds to pay for goods/services on the websites via the PayDo eWallet method;
- withdraw on other bank accounts;
- request PayDo Visa/Mastercard card and use it for all the purchases.
You can find more detailed information about the withdrawal flow and what data is required in our Documentation.
Please find the short video guide by following the link.
On the checkout page, the payers can check the details of the requested order (its ID and amount), choose the preferred language of this page (among 12 available), and select the most convenient payment method to process a transaction.
All the methods are grouped according to their types (eWallet, Bank Transfer, Cards International, etc.), and to complete the payment, the user should: find the needed group → select the method → fill in the required data.
There is also a possibility to use the search bar to find a specific method.
Some methods are only available for certain countries, so the IP and Geolocation for payment must be changed accordingly.
For example, Italian payment methods will be available on the payment page if a user has Italian as the default browser language, Italian IP, and geolocation.
Currently, we don`t have a test mode, but once the option is available, we will inform you in our notification letters and add detailed instructions to the website.
For now, to test the integration, you can make real payments with minimal amounts. For the testing to succeed, we advise you to use real data.
In case of successful project verification, the secret and public keys become available in the details of your project.
To find them, please go to your admin panel's `Projects` section and click the `Details` button near the needed project. You will find the keys below the project description.
Sure, if you want to show only one payment method on your checkout page, you need to specify the payment method ID when creating an invoice using the `Create invoice` request for the "Payment method" parameter.
To redirect the payer to the payment method page, bypassing the Payop checkout page, you must provide us via API with the payer information fields required for the "payment method" you specified in the request.
Required fields can be found in the `config` of the response for the following API request.
Example of the request:Create Invoice · Payop/payop-api-doc
Please allow only the following IP addresses to receive IPN notifications:
18.199.249.46
35.158.36.143
3.125.109.58
3.127.103.117
The Payop WordPress plugin is a tool for accepting online payments on your WordPress website, integrated with the popular e-commerce platform WooCommerce. This plugin equips your website to receive payments from customers using various payment methods. It's important to note that Payop functions as a plugin embedded within WooCommerce, simplifying the process of integrating payment capabilities into your online store.
Installation from WordPress Plugin Store:
1.Open the WordPress admin panel and go to the "Plugins" section.
2.Click on "Add New."

3.In the search bar, type "Payop."
4.Click "Install."
5.After installation, click "Activate."
Manual Installation:
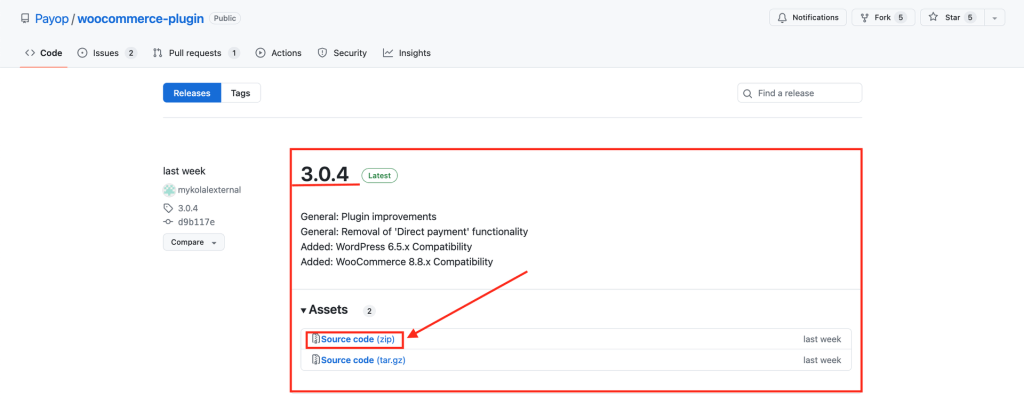
1.Go to the Payop plugin page.
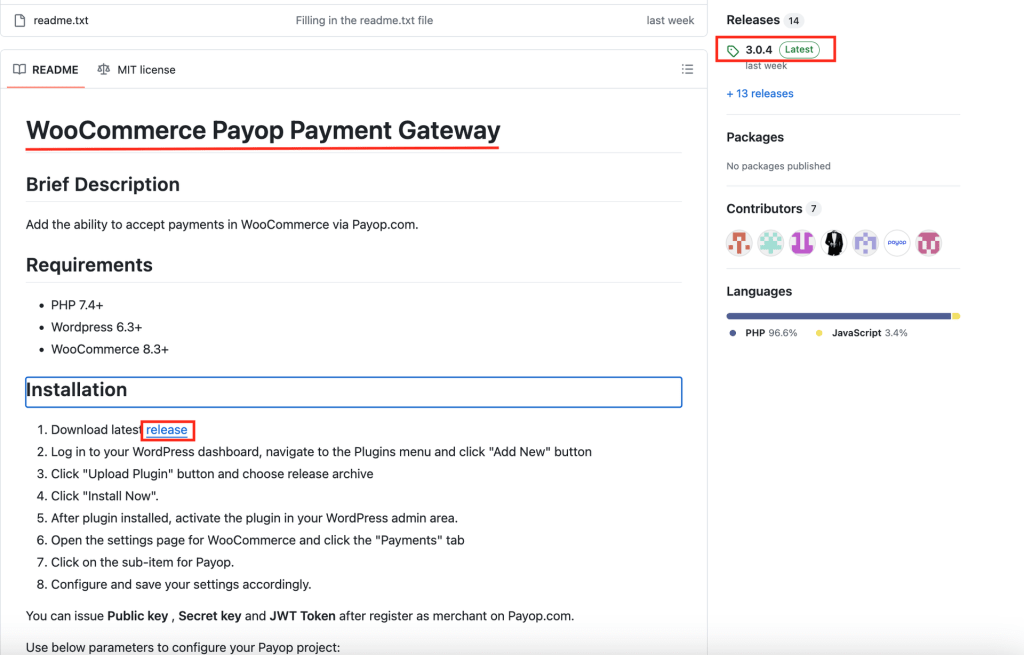
2.Download the latest version of the plugin in .zip format.
3.Open the WordPress admin panel and go to the "Plugins" section.
4.Click "Add New."
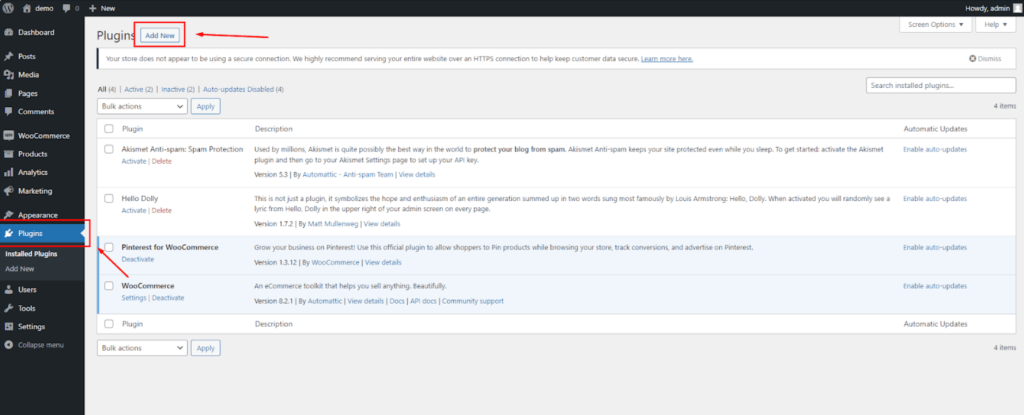
5.After that, click "Upload Plugin" and select the downloaded .zip file.
6.Click "Install" and then "Activate."

Configuring the Payop Plugin in WooCommerce:
1.Ensure the Payop plugin is activated on your WordPress website. If it's not already active, follow these steps:
- Open your WordPress admin panel.
- Navigate to the "Plugins" section.
- Look for the Payop plugin and click "Activate" if it's listed but inactive.
2.Access WooCommerce Settings. In your WordPress admin panel, go to the WooCommerce settings to configure the Payop payment gateway:
- Click on "WooCommerce" in the left-hand menu.
- Click on the `Settings` button.
3.Navigate to the "Payments" tab. Within the WooCommerce settings, select the "Payments" tab. This is where you can manage all payment-related configurations for your online store.
4.Locate the Payop Payment Option and Configure:
- Scroll down to find the option related to Payop among the available payment methods. You should see "Payop" or the name you specified in the "Name of payment gateway" field when setting up the plugin.
- Click on the Payop option to access the plugin's settings. This is where you will configure the details required for Payop payments to function correctly.
- Fill in the required Public key and Secret key fields.
- Name of payment gateway. In this field, you can specify the name customers will see at the checkout when choosing the Payop option to pay for an order.
- Description. In this field, you can briefly describe the payment gateway, which will be visible to customers on your website. It helps customers understand that they can use Payop for online payments.
- Automatic transfer of the order to the status "Completed" after successful payment. Enabling this option will automatically change the order status to "Completed" once a successful payment is made via Payop.
- Skip page checkout confirmation. If enabled, this option allows you to skip the confirmation page during the checkout process, streamlining the payment process for customers.
- Payment form language. This setting enables you to select the language for the payment form displayed on your website. Choose the language that best suits your customers.
- Save Your Settings. After entering the necessary information, make sure to save your settings within the Payop plugin. You will typically find a "Save" or "Update" button at the bottom or top of the plugin settings page. Click on it to save your configurations.
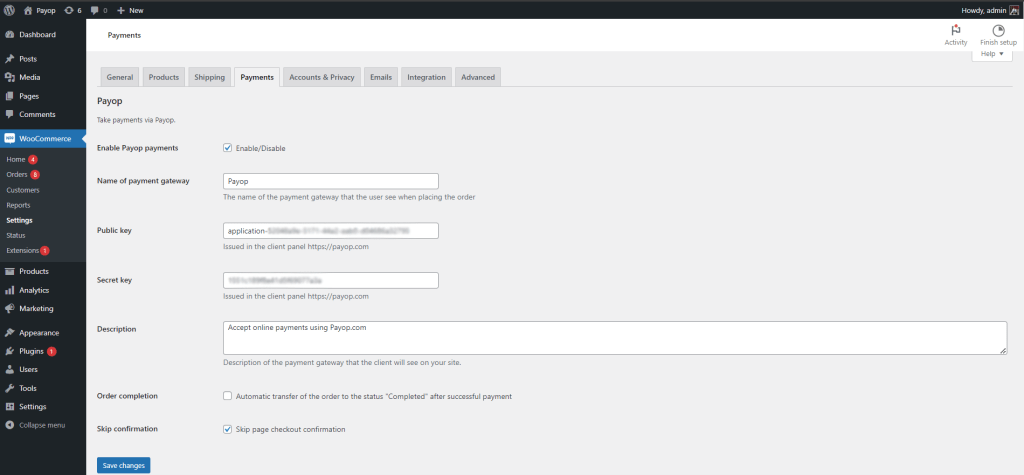
By following these steps, you have successfully configured the Payop plugin within WooCommerce on your WordPress website. This will allow your online store to accept online payments using Payop as a payment gateway.
Please check the video instruction by following the link.
There are two options to check the status or details of a particular payment.
1. Go to the Transactions section of your admin panel -> click on the Filter option -> add at least one known criteria of the required payment, such as transaction ID, order ID, amount, date, invoice ID, payer email or other.
2. By making an API request. For more information, check the instructions in our Documentation - Get Transaction Details · Payop/payop-api-doc
Pre-check form is an initial step in verifying your application, where you must fill in information about your company, representatives and project (website). You may add as many projects for review as you want to.
We do not require any documents at this stage to make the process easier and faster for you. Usually, it takes no more than 5 minutes to enter all the details.
If your pre-check application is pre-approved, the dedicated account manager will contact you with further instructions and a list of documents that must be submitted to complete the verification.
If your pre-check application is rejected, you will receive a notification via email stating the reason.
The review timeframe for the pre-check form is two business days from the submission date.
Please find the short video guide on how to submit the pre-check by following the link: Pre-Check Verification with Payop | Payop payment processing.
After clicking Confirm&Pay at checkout, you`re redirected to the payment method page to fill in the remaining information. At this stage, the initiated transaction has already been created and cannot be cancelled either on the method`s side or in our system.
It can be completed and, if successfully processed, get the Accepted status or declined if you do not enter the required data and leave the checkout page.
If you leave the payment page, the initiated transaction will be automatically declined within the timeframes for such payment processing. For some methods, it`s 24 hours, and for others - the processing time and decline take several business days.
Please note that each payment has defined system timeframes on how fast it can be processed, depending on the method type. When the initiated payment is not completed within the given deadline, it will receive the Timeout status, and you will be informed about that in our notification message.
What can be the reasons why the payment has not been completed?
- Your bank declined the transaction. You may contact your bank to clarify the issue.
- The processing bank rejected the payment request. Unfortunately, due to internal policies and procedures, payment partners do not always give us an exact reason for that.
- You didn`t fill in the required details or left the checkout page without completing the payment.
If the funds were debited from you, they will be automatically credited back to your account within the next business days.
Once you click on Confirm&Pay on the checkout page, you will get a notification email with the main details of your requested order and the Check the status link, which you may use to trace the actual status of your digital payment.
By clicking the Check the status button, you`ll be redirected to a page where you can track the payment's current status in real-time with a short description for each status update.
Once the transaction is processed, you will receive a follow-up email with the payment's final status and the main details (date, amount, website, order ID, etc). The information on the tracking page is also updated accordingly, allowing you to access it anytime.
Pay by Bank is a payment method based on the open banking concept. It allows you to pay for goods and services directly from your bank account without entering sensitive data on the website where you make the purchase. This solution is getting increasingly popular among EU users, as it takes a few clicks to make such a payment.
It works really simply. At the checkout, you choose Pay by Bank from the list of available payment methods, select the bank you want to make the payment with, log into your bank account, and confirm the transaction.
Once your bank authorises the requested payment, the funds are transferred and processed on our bank`s side, and as soon as the transaction gets its final status, the merchant receives confirmation of the successful payment.
The main benefits of this method are:
- Security. You complete the payment using your bank account application.
- Fast processing. Such bank transfers are usually completed in a few minutes.
Important note. Please do not repeat the processed payments by bypassing the checkout page and going directly to our bank account. Such payment won`t be credited to the merchant as it`s not related to any of the website`s orders. To make a purchase, go to the merchant`s website, choose the relevant Payop payment method, and complete it on the checkout page by entering the required data.
Since Payop is a payment service provider, we do not directly provide the payers with any goods/services they paid for on the website. We only process the initiated payments. Our involvement starts when you choose our payment method and ends once the payment is successful.
Therefore, if you have any order-related issues with your purchase or, for some reason, want to request a refund, you should contact the merchant (website administration) to investigate your inquiry further and find the proper solution.
It should also be noted that refunds cannot be initiated from our side. The merchant should request it in their dashboard.
It`s our high-priority task to process the payments as quickly as possible so you, as a payer, can get your purchase on the merchant`s website in a few minutes. Our team is constantly working on our payment solutions to make them faster, with higher conversion rates and low fees. However, several factors can impact the processing time, and we cannot affect that from our side.
The following factors can cause the delay of the initiated transaction:
- Payment scheme your bank supports. If your bank doesn't support instant bank transfers, the processing time for such a payment can be a few business hours instead of several minutes (or a business day, in some cases).
- Bank business hours and holidays. It`s a significant factor affecting the payment processing flow. If the transaction was initiated outside the bank`s business hours or during public holidays, such payments are usually processed on the next working day.
- Security measures. As a regulated payment company, we must prevent fraudulent activity, money laundering and terrorist financing. To ensure that, in some cases, additional information requests or manual online payment checks can be required, which can lead to processing delays.
The processing time can be different, depending on the payment method you selected on the checkout page:
Almost all secure payments must be credited instantly. The maximum technical timeframe for transactions is 24 hours. If your payment wasn't credited within this time, please contact us at support@payop.com and attach your proof of payment.
For a cash method, the transaction will be processed once you transfer funds. You have 48 hours to complete your initiated payment.
For a Pay by Bank method, the processing time depends on the payment scheme your bank supports (instant, non-instant) and the bank transfer currency. Instant banking transactions in EUR and all payments in GBP are typically credited within a few minutes. Payments via non-instant channels usually arrive within an hour, but the banks occasionally delay them up to 24 hours. Please also note that payments initiated on weekends or holidays may be credited the next business day.
If your digital payment hasn`t been processed within the mentioned timeframes, you can contact our support team at support@payop.com with your payment confirmation, and we will check your transaction`s status.
Below, you can find a few examples of the relevant payment proofs for different payment methods.
There are five types of balances:
1. The Available balance refers to the funds available for withdrawal. If you have passed the verification and started processing payments, you can apply for the withdrawal of funds from the available balance at any time.
2. The Rolling Reserve refers to a percentage (5-10%) of the transactions received that is held for three months. It is a standard practice in payment processing used to cover possible chargebacks/refunds or fraudulent activities. After the specified period, the funds are transferred to the Available balance.
3. The Pending balance refers to the funds expected to move into the available balance after the buyer pays for the item. The period for which funds are withheld depends on the type of account verification, project history, turnover, industry, risk level and other factors considered during project verification. You can check all the holds applied to your account in the Pending transfers section.
4. The Referral balance refers to the funds earned through our affiliate program.
5. The Total amount refers to the sum of all balances for each currency.
As a payment service provider, Payop provides a unified platform for accepting, processing and withdrawing funds for businesses of all sizes and industries.
Key Payop benefits:
- Access to 170 countries and 100+ currencies allows you to enter foreign markets easily.
- Availability of a wide range of local and international payment methods allows you to choose the most relevant solutions for your clients in particular regions.
- Possibility to connect all available payment methods with a single contract.
- Secure payment processing due to compliance with international standards (PCI DSS level 1) and advanced anti-fraud.
- Intuitive admin panel with access to all the information about your merchant account.
- Possibility to add an unlimited number of projects in one account.
- Fast verification is only on the Payop side, giving access to all possible payment methods (depending on the industry) without additional document submission to each payment provider separately.
Payop provides a secure and reliable payment solution for various online businesses across different industries, including e-commerce stores, digital content providers, software vendors, and more.
However, there are certain business areas and models that we do not support.
Please refer to the list below for more information:
CBD (Cannabidiol) products
Tobacco and alcohol sales (including e-cigarettes and oils)
Tourism (hotel reservation/flight sales/tour sales, etc.)
Charity
Deepfakes
Prostitution
Visas and driver's licenses services
Off-line services (providing physical jobs, work visas, local food delivery, etc.)
Replica of famous brands (Gucci, Chanel, Adidas, Rolex, etc.)
Branded goods sales (excluding those that have certification )
Esoteric consulting (astrology, numerology, etc.)
Online course providers
Credits
Fake projects on popular websites
Sale of medicines, dietary supplements, and cosmetics
Healthcare industry
IPTV - Internet television
Video hosting
The entertainment industry (film production, event management, etc.)
Consumables, consumer goods
Sites with symbols of radical organizations
Insurance
Crypto and forex trading signals
Web development, SEO, consulting services, web design, programming, project management, call center services
Arms and weapons trade
Illegal, non-regulated or forex company regulated/based in a high-risk jurisdiction
Copywriting, books sales
Precious stones sales
Dating/Adult websites
At Payop, we believe in responsible financial practices and compliance with regulations across the globe. As such, we do not provide our services to the legal entities and private entrepreneurs, which registered and/or residing in the following countries:
- Abkhazia (the Republic of)
- Afghanistan (the Islamic Emirate of)
- Belarus (the Republic of)
- Bosnia and Herzegovina
- Burundi (the Republic of)
- Central African Republic
- Congo (Democratic Republic of the ) - Kinshasa
- Crimea (the Republic of)
- Cuba (the Republic of)
- Donetsk (region of Ukraine)
- Guinea (the Republic of)
- Guinea-Bissau (the Republic of)
- Haiti (the Republic of)
- Iran (the Islamic Republic of)
- Iraq (the Republic of)
- Kherson (region of Ukraine)
- Khojavend (territory of Azerbaijan)
- Khojali (territory of Azerbaijan)
- Khankendi (territory of Azerbaijan)
- Lebanon (the Lebanese Republic)
- Libya (the State of)
- Luhansk (region of Ukraine)
- Mali (the Republic of)
- Myanmar / Burma (the Republic of the Union of Myanmar)
- Nicaragua (the Republic of)
- North Korea (Democratic People`s Republic of Korea / DPRK)
- Northern Cyprus (Turkish Republic of)
- Palestine (the State of)
- Russia (the Russian Federation)
- Somalia (the Federal Republic of)
- Somaliland (the Republic of)
- South Ossetia (the Republic of)
- South Sudan (the Republic of)
- Sudan (the Republic of the)
- Syria (the Syria Arab Republic)
- Taiwan (the Republic of China)
- Transnistria (Pridnestrovian Moldavian Republic)
- United States of America
- Venezuela (the Bolivarian Republic of)
- West Bank & Gaza Strip
- Western Sahara (the Sahrawi Arab Democratic Republic)
- Yemen (the Republic of)
- Zaporizhzhia (region of Ukraine)
- Zimbabwe (the Republic of)
Please note that this list is subject to change at any time, as we constantly monitor legislation and regulatory changes and update our policies accordingly.
Furthermore, we reserve the right to reject transactions from any country or merchant at our discretion, based on factors such as risk assessment, compliance requirements, and regulatory restrictions.
In addition, please be aware that if the Ultimate Beneficial Owner (UBO) of a legal entity or its corporate business structure is registered and/or residing in the banned countries, we reserve the right to refuse service without requesting the UBO's proof of address. Our company strictly adheres to international sanctions and trade regulations and is an important measure that we take to ensure that our financial services are not being used for illegal purposes.
We are committed to providing transparent and reliable payment services to our customers, and we appreciate your understanding and cooperation in maintaining a safe and compliant financial ecosystem.
To add our payment methods to the website, kindly proceed with the following steps:
1.Register on our website and submit a pre-check application: https://account.payop.com/en/auth/registration.
2.Sign the Merchant Agreement.
3.Provide the required documents for Business Account verification.
4.Set up the integration and start accepting payments: https://github.com/Payop/payop-api-doc.
The short video guide on how to start processing with Payop: How to start processing with Payop? | Payop payment processing.
To register with Payop, you need to:
1.Visit our website and go to the Sign-up page.
2.Enter your email, phone, and website address and set a password.
3.Read our Terms and Conditions and confirm you agree to them.
4.Confirm that you are not a robot.
5.Click `Create an account`.
6.You will receive an email with a confirmation link within several minutes. Follow the link to confirm your account and submit a pre-check application.
To receive a merchant account and the ability to accept online payments, each website must meet certain criteria.
This includes the availability of:
1.The logos of the payment systems whose payments you will accept.
2.Contact us page.
3.Information about the company. The website must indicate the official name of the company, its address, and the country in which the merchant's main business entity is registered. This information helps companies gain consumer confidence and must be indicated on the checkout or payment data entry pages.
4.Terms of delivery. When selling goods online, you must provide detailed information about the delivery time of the goods.
5.A detailed description of goods and services. Make sure the offered product matches the description on the website.
6.Privacy Policy, Return & Cancellation Policy.
7.SSL certificate.
Payop partner program allows you to earn simply by inviting a merchant into our system.
Do you know anyone who might be interested in our services? Send them a referral link with which they will register in our system and receive up to 10% of their paid commissions. The program is valid for 91 days from the date of such merchant's first accepted transaction.
Users can be invited either through the link, which can be found in the Affiliate section of the merchants' admin panel, or by contacting our support team at support@payop.com.
More detailed information on the Affiliate Terms:
Payop Terms And Conditions of Affiliate Program - Payop
Yes, you can submit a new project after the pre-check or full account verification. You can do it in your admin panel, and our team will review it as soon as possible.
To add a new project, please refer to the next steps:
1.Go to the `Projects` section in your dashboard and click the `Add new` button.
2.Fill in information about your project.
3.Click `Send for verification`.
Once our team evaluates the provided information, you will receive a notification about the application status. The secret and public keys needed for integration will be available in the project`s details if it's verified.
In our system, a project is your website used to make sales and generate revenue, on which you want to accept payments using our payment solutions. Projects are primarily intended to identify and confirm that requests correctly come from your server to the Payop server.
There is no need to create a merchant account for each website if they refer to one business entity. You can create multiple projects in your account.
You should register and verify a new merchant account only if you want to submit a new project that belongs to your other company (new entity).
The KYCB platform is a verification service that aims to automate and simplify the onboarding flow. In addition to its easy-to-use interface, what is more important is data security – KYCB employs advanced encryption methods to safeguard the confidentiality and integrity of your verification details.
After your PreCheck application is approved, you`ll receive a notification email with the link to the KYCB platform under the `Complete verification` button.
Once you`re redirected to the verification page, you should fill in the required details about your business and attach the necessary documents, depending on your industry.
For company verification, you should submit the information in the following sections:
Company information;
Registration documents;
Director-signatory`s documents;
UBO(s) documentation;
Shareholder(s) documentation;
Additional documentation;
Industry documentation.
For individual entrepreneurs, the sections are the following:
Individual entrepreneur's information:
Individual entrepreneur's name;
Tax identification number;
Country of Incorporation;
City of business registration.
Registration documents:
Extract from the register of individual entrepreneurs;
Tax registration confirmation of private entrepreneurship as a taxpayer.
Individual entrepreneur's documentation:
Individual entrepreneur information (Passport or ID Card);
Proof of address document of the individual entrepreneur (Proof of residence).
In each section, you may find the explanation for each document type and important notes, if applicable.
It is important to note that you have more than one attempt to submit the information. You can exit and access the verification page as many times as needed until all information has been added. Your data will be encrypted and protected throughout the process.
You can review, download, and change any information or document you provided until you click `Confirm&Send`. After confirming your actions using this button, your application will get a new `Ready for verification` status, awaiting review by our verification specialist.
If our team has any questions regarding the provided details or if some data should be updated, you will receive a notification email with all the details.
If you have any questions or need our assistance, please email our Support team at support@payop.com or contact your Account Manager.
IPN notifications (callbacks) may not arrive for several reasons:
1.The IPN callback URL is specified incorrectly or has not been added in the Payop admin panel.
You can check the correctness or presence of the specified address in the IPN section of the Payop admin panel.
In case IPN notifications were not delivered to your IPN URL, our service automatically repeats attempts to send a callback several more times. Afterwards, callbacks can be sent manually by our Support Team.
Unfortunately, the IPN callbacks can not be resent for the transactions created before adding or changing the IPN URL.
2.The IPN callback functionality is not working properly on your side.
Please refer to the following article to set up the IPN URL:https://github.com/Payop/payop-api-doc/blob/master/5.IPN/ipn.md.
You can check the following article to learn how to check notifications and troubleshoot your IPN URL: How to test payment notifications.
To change or add the IPN callback URL, use the IPN section in the admin panel, or contact our support team via Tickets and specify the address to receive notifications. Also, our support team will gladly assist you in troubleshooting your IPN URL.
Only verified projects can use our plugins or API requests.
You can check your project verification status in the Projects => Project list section of the Payop admin panel.
Furthermore, once your application is verified, you should receive a notification at your registered email.
If the issue persists even though your project status is `Accepted`, please contact our support team via Tickets.
Unfortunately, we currently do not have any sandbox or test environment. We hope these features will be available soon.
To test your integration, you can make a live payment, indicating a minimum amount possible to receive a successful transaction or cancel the transaction when entering the payment details. In this case, you will receive a notification about the payment cancellation.
If a transaction is successful or failed, you should receive an IPN callback to the IPN URL, which has been indicated in the IPN section of the Payop admin panel.
You can test your IPN URL using Postman (or any other API testing environment).
To do so, we recommend you send a POST request indicating your IPN URL as an endpoint.
An empty JSON object or example IPN callback can be indicated in the request body to troubleshoot your IPN URL service.
If you made a live payment, you can contact our support team via Tickets. They will resend an IPN callback and assist with troubleshooting your IPN URL service.
A refund is a reimbursement transaction in favour of the payer for a cancelled order.
Refunds can be full or partial. A partial refund is a refund of a certain amount of the transaction, while a full refund is a repayment of the entire amount.
You can see a list of all your created refunds and the details for each of them in the Refund section of your Merchant account.
Refunds can have one of the following three statuses:
- New - the refund is awaiting confirmation or rejection.
- Accepted - the refund went through automatically or was confirmed by the operator. Funds were debited from the balance and sent to the payer.
- Rejected - the operator rejected the refund (can be done with or without the commission).
Note that funds will be returned via the same method used to make the original payment.
In the details of a particular refund, you can also find the details of the parent transaction. If necessary, you can open it in a new window by clicking on this button  .
.
You may request a refund using your admin panel or via an API request.
To create a refund in the Admin panel, use the following instructions:
Go to the Transactions section of your merchant account.
Find the required transaction and click the Details button.
Scroll down to choose the refund type: partial or full. If you issue a partial refund, please enter the amount you would like to return and click Confirm to create a request. If it`s a full refund, just click the Refund button.
A refund request will be sent to the relevant team for review. As soon as the request is processed, the refund status will be updated to Accepted or Rejected (the reason for that will be indicated in the refund details).
To create refund requests via the API, please use our Documentation -Refund · Payop/payop-api-doc
Chargeback is a `forced` refund procedure where a user wants to receive back the funds for a processed payment by contacting their bank directly.
If the chargeback request we receive can be disputed, our department in charge will inform you via tickets and ask for the details that our payment partner requires for further investigation. There is always a certain timeframe in which you must provide the requested data to our team: in some cases, it can be one business day, and in others, three business days (it depends on the type of request). Therefore, if you wish to dispute an issue, please consider this and submit the information within the deadline specified by our team in the ticket.
Please note that there is also a fine starting from 20 USD for each chargeback.
You can find the initiated chargebacks with their current statuses (New/Accepted/Rejected) in the Chargeback section of your admin panel.
In the details of a particular chargeback, you can also find the details of the parent transaction. You can open it in a new window by clicking this button .
You may easily perform the currency exchange in your merchant account.
To do that, follow these steps:
1. Go to the Exchange section.
2. Select the currencies you would like to exchange from the drop-down list and fill in the amount.
3. Push theConvertbutton to complete the exchange.
Before confirming the transaction, you can review the exchange rate and the amount you will receive.
Once the procedure is complete, you will receive a notification about the successful operation.
There is also an autoexchange operation which is applied when there are insufficient funds to complete your withdrawal. For instance, you have 900 EUR and 200 USD on your merchant balance, and you have requested a withdrawal of 1000 EUR. In that case, the system will charge 900 EUR from your EUR balance and automatically make an exchange for the remaining amount (100 EUR) from your USD balance to complete the request.
You can find this exchange operation in the `Currency exchange history` section of the `Exchange` tab.
You may generate and download detailed transaction reports in the Reports section of your merchant account.
To request a report, follow these steps:
1. Go to the Reports section in the admin panel.
2. In the Report type dropdown, select the desired type of report:
- Checkout transactions - transactions processed via the checkout (payment) page.
- Affiliate transactions - payments of the merchants you`ve invited via our Partner Program and the commission amount you earn.
- Refunds - payments that you returned (fully or partially) to your users for the requested orders.
- Chargeback - payment disputes received from our payment partners due to your payers' complaints.
- Charge transactions - Payop system charges.
- Withdrawals (basis details) - a report containing a withdrawals list with such basic details as amount, currency, pay amount, fee, created data, and the status.
- Pending transfers - successfully processed payments that are currently held on the Rolling Reserve and Pending balances with the indicated remaining time for each balance, when the transaction will be credited to the Available balance.
- Exchange history - exchange operations.
- Withdrawals (full details) - in addition to basic details (amount, currency, pay amount, fee, created data, status), this report includes Beneficiary details given in the withdrawal requests.
- Balance statement - a statement with the actual balance on each currency wallet per the requested date.
3. Choose a period (up to 93 days) and other required data, like payment method or report format (depending on the report type).
4. Click the Create report button.
After the report is generated and has the Finished status, you can download it by pressing the ⇩ symbol in the Download the report area.
If you get Failed status for the requested report, it means there is no data matching the selected criteria.
If you want to export the data for a longer period, please make several report requests, or you may contact our Support team at support@payop.com, and we will be happy to assist you.
The Test checkout sub-section allows you to preview the payment page your customers will see, create an invoice, and test the checkout process.
If you want to see the checkout page for a particular payment method, select it in the Payment method field. Otherwise, if you want to view the general checkout with all available methods, keep the default All payment methods selected.
If you have several websites, in the Select project field, choose the one you want to use for the test.
Amount, Order ID, and Currency details are pre-defined, so you can proceed with the test using this data or modify it if needed.
Then, you click the Show payment page button and are redirected to the Checkout page.
You can also change the checkout page language and country at the top of the page. Usually, those values are defined by the payer`s browser language and location. However, page language can be changed by entering the {{locale] value in the checkout page link https://checkout.payop.com/{{locale]/payment/.
Alternatively, you can use the API to generate an invoice and a link to the Checkout page.
A certificate is required to create a mass-withdrawal request and to ensure it will be processed securely:
Create Mass Withdrawal · Payop/payop-api-doc
It can be generated in Settings => Certificate section.
As a result, a `stream` file will be downloaded to your device.
It contains an encoded binary string.
You can find information on how to use a certificate here:
Create and Encrypt Withdrawal Payload · Payop/payop-api-doc
If a certificate has been compromised, we strongly recommend you contact our support team via Tickets.
JWT token is needed in requests where additional authentication is required to ensure the security of the sensitive information being passed via API request or received via API response.
You can generate it in your dashboard:
1. Navigate to the "Settings" section
2. Locate the "JWT Tokens" tab
3. Click on "Add New Token" and follow the on-screen instructions
4. Please keep in mind that all JWT Tokens should be created with an expiration date.
There are 2 types of JWT tokens available:
With IP whitelist: This token provides increased security by allowing you to restrict usage to specific IP addresses. Note that the whitelist cannot be modified once created, so you'll need to generate a new token if your IP address changes. We highly recommend choosing this option.
Without IP whitelist: Standard JWT token without IP whitelist.
As a result of token creation, you will get a string in the following format: "token": "xXXxx0X00…."
In your requests, you should use only the token`s value.
If a JWT token has been compromised, we strongly recommend deleting it and creating a new one.
Please check the short video guide by following the link.
Once the payment is processed and gets its final status (Accepted or Rejected), you will receive an IPN notification to the specified URL. You can also check the payment statuses in the `Transactions` section of your account.
There are two ways you can check the availability of payment methods for your project.
1) Go to the `Payment Methods` section of your admin panel and choose the project for which you want to check the enabled methods with the applied fees.
2) Make an API request for more details like payment method ID, type, and supported countries.
Get Available Payment Methods · Payop/payop-api-doc
Please be advised that there is a wide range of API testing tools (e.x. Postman, REST-assured, JMeter, Curl, etc.) to make API requests and receive information, you need to choose the most convenient for you.
Step-by-step video instruction: How to find available payment methods for application/project | Payop.
If you want to add a payment method that is not available for your application now, please contact our Support team via email at support@payop.com or our Ticketing system. They will clarify your request with the relevant department. If enabling the requested method for the project is possible, our team will make the necessary adjustments.
In case a certain method is not relevant for your customers, you may deactivate it in your merchant account:
- go to the Payment Methods section;
- find the needed method using the Search field;
- disable it using On/Off toggle.
You can always contact our technical team for any technical questions or issues. To help us investigate and reproduce the issues you are experiencing, we ask that you provide us with the following information:
- browser version
- IP address
- connection type
- time and date the issue occurred
- screenshots* or video recordings showing the issue (Error codes and messages / API response)
- your steps to reproduce the issue
- test access to your site (if it`s restricted)
- URL request (Right-click on the error request in the DevTools => Copy => Copy as cURL (cmd))
- for the issues related to the Payop admin panel, your user session (Browser Devtools => Application => Local Storage => Payop => user-session value (please copy the value).
- logs or API responses on your side, if any.
- for the integration-related issues, the body of your API request
*We recommend providing screenshots with the developer console enabled to see the error message and headers. (F12 (DevTools) => Network tab => Click on the error request).