Integration
There are two main options for integrating our payment solutions into your website: using API or CMS plugins (WooCommerce, WordPress, Opencart).
To check the relevant information for each connection type, please refer to our Documentation.
If you have any questions or need assistance with integration, please contact our technical support via Tickets or at support@payop.com. Our team will help with your issue or guide you on where to check the information.
On the checkout page, the payers can check the details of the requested order (its ID and amount), choose the preferred language of this page (among 12 available), and select the most convenient payment method to process a transaction.
All the methods are grouped according to their types (eWallet, Bank Transfer, Cards International, etc.), and to complete the payment, the user should: find the needed group → select the method → fill in the required data.
There is also a possibility to use the search bar to find a specific method.
Some methods are only available for certain countries, so the IP and Geolocation for payment must be changed accordingly.
For example, Italian payment methods will be available on the payment page if a user has Italian as the default browser language, Italian IP, and geolocation.
Currently, we don`t have a test mode, but once the option is available, we will inform you in our notification letters and add detailed instructions to the website.
For now, to test the integration, you can make real payments with minimal amounts. For the testing to succeed, we advise you to use real data.
In case of successful project verification, the secret and public keys become available in the details of your project.
To find them, please go to your admin panel's `Projects` section and click the `Details` button near the needed project. You will find the keys below the project description.
Sure, if you want to show only one payment method on your checkout page, you need to specify the payment method ID when creating an invoice using the `Create invoice` request for the "Payment method" parameter.
To redirect the payer to the payment method page, bypassing the Payop checkout page, you must provide us via API with the payer information fields required for the "payment method" you specified in the request.
Required fields can be found in the `config` of the response for the following API request.
Example of the request:Create Invoice · Payop/payop-api-doc
Please allow only the following IP addresses to receive IPN notifications:
18.199.249.46
35.158.36.143
3.125.109.58
3.127.103.117
The Payop WordPress plugin is a tool for accepting online payments on your WordPress website, integrated with the popular e-commerce platform WooCommerce. This plugin equips your website to receive payments from customers using various payment methods. It's important to note that Payop functions as a plugin embedded within WooCommerce, simplifying the process of integrating payment capabilities into your online store.
Installation from WordPress Plugin Store:
1.Open the WordPress admin panel and go to the "Plugins" section.
2.Click on "Add New."

3.In the search bar, type "Payop."
4.Click "Install."
5.After installation, click "Activate."
Manual Installation:
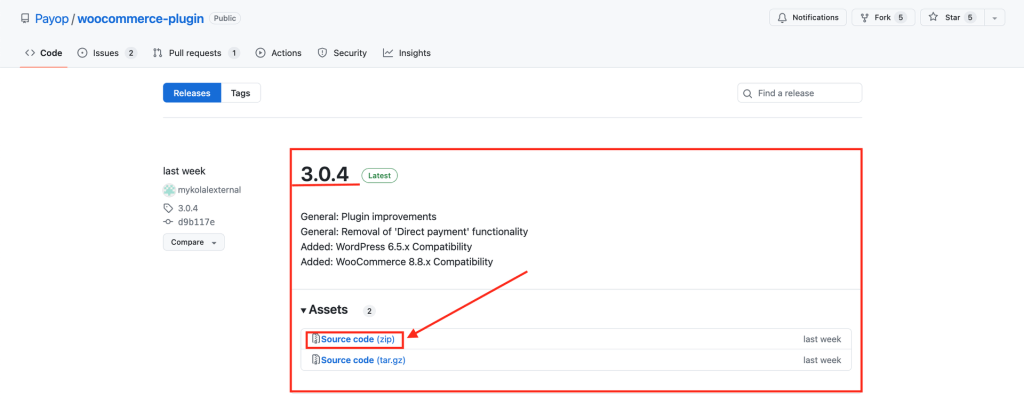
1.Go to the Payop plugin page.
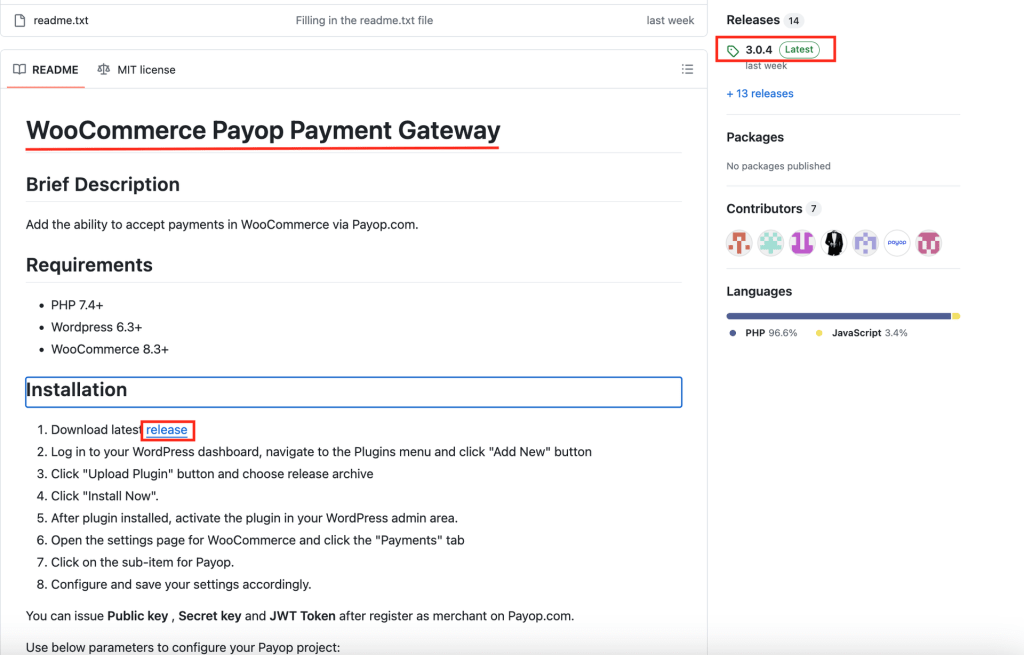
2.Download the latest version of the plugin in .zip format.
3.Open the WordPress admin panel and go to the "Plugins" section.
4.Click "Add New."
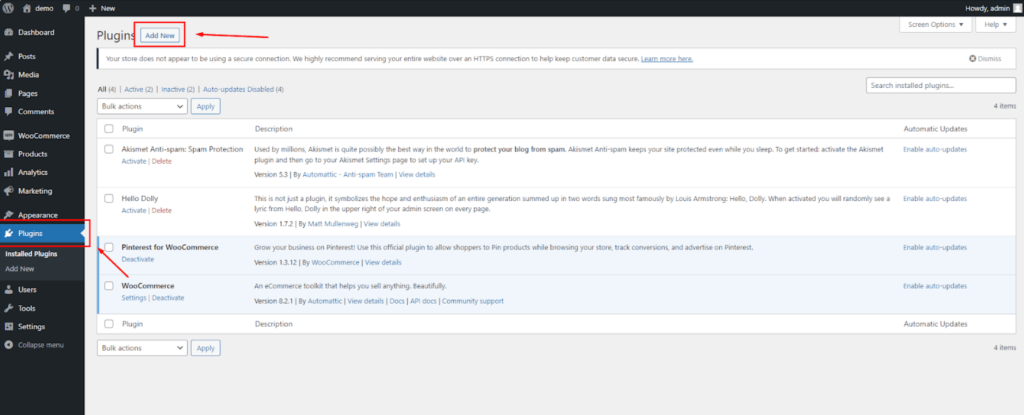
5.After that, click "Upload Plugin" and select the downloaded .zip file.
6.Click "Install" and then "Activate."

Configuring the Payop Plugin in WooCommerce:
1.Ensure the Payop plugin is activated on your WordPress website. If it's not already active, follow these steps:
- Open your WordPress admin panel.
- Navigate to the "Plugins" section.
- Look for the Payop plugin and click "Activate" if it's listed but inactive.
2.Access WooCommerce Settings. In your WordPress admin panel, go to the WooCommerce settings to configure the Payop payment gateway:
- Click on "WooCommerce" in the left-hand menu.
- Click on the `Settings` button.
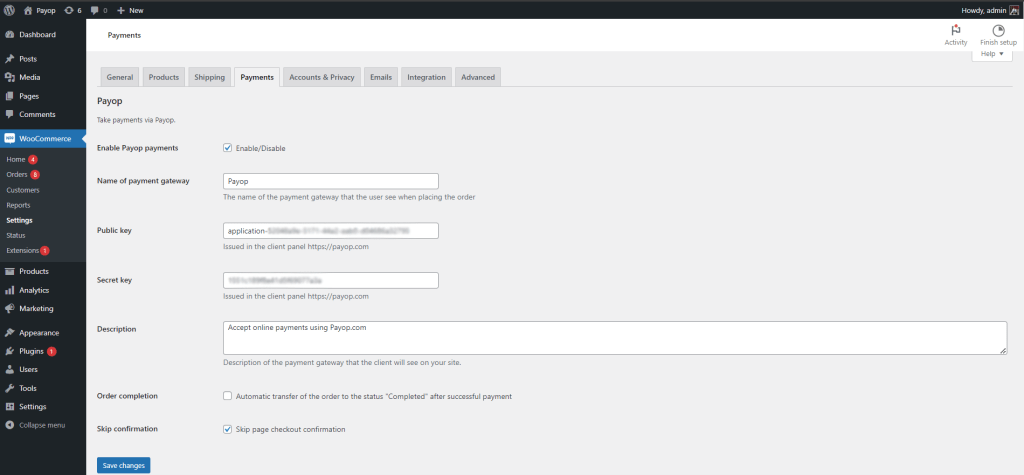
3.Navigate to the "Payments" tab. Within the WooCommerce settings, select the "Payments" tab. This is where you can manage all payment-related configurations for your online store.
4.Locate the Payop Payment Option and Configure:
- Scroll down to find the option related to Payop among the available payment methods. You should see "Payop" or the name you specified in the "Name of payment gateway" field when setting up the plugin.
- Click on the Payop option to access the plugin's settings. This is where you will configure the details required for Payop payments to function correctly.
- Fill in the required Public key and Secret key fields.
- Name of payment gateway. In this field, you can specify the name customers will see at the checkout when choosing the Payop option to pay for an order.
- Description. In this field, you can briefly describe the payment gateway, which will be visible to customers on your website. It helps customers understand that they can use Payop for online payments.
- Automatic transfer of the order to the status "Completed" after successful payment. Enabling this option will automatically change the order status to "Completed" once a successful payment is made via Payop.
- Skip page checkout confirmation. If enabled, this option allows you to skip the confirmation page during the checkout process, streamlining the payment process for customers.
- Payment form language. This setting enables you to select the language for the payment form displayed on your website. Choose the language that best suits your customers.
- Save Your Settings. After entering the necessary information, make sure to save your settings within the Payop plugin. You will typically find a "Save" or "Update" button at the bottom or top of the plugin settings page. Click on it to save your configurations.
By following these steps, you have successfully configured the Payop plugin within WooCommerce on your WordPress website. This will allow your online store to accept online payments using Payop as a payment gateway.
Please check the video instruction by following the link.
IPN notifications (callbacks) may not arrive for several reasons:
1.The IPN callback URL is specified incorrectly or has not been added in the Payop admin panel.
You can check the correctness or presence of the specified address in the IPN section of the Payop admin panel.
In case IPN notifications were not delivered to your IPN URL, our service automatically repeats attempts to send a callback several more times. Afterwards, callbacks can be sent manually by our Support Team.
Unfortunately, the IPN callbacks can not be resent for the transactions created before adding or changing the IPN URL.
2.The IPN callback functionality is not working properly on your side.
Please refer to the following article to set up the IPN URL:https://github.com/Payop/payop-api-doc/blob/master/5.IPN/ipn.md.
You can check the following article to learn how to check notifications and troubleshoot your IPN URL: How to test payment notifications.
To change or add the IPN callback URL, use the IPN section in the admin panel, or contact our support team via Tickets and specify the address to receive notifications. Also, our support team will gladly assist you in troubleshooting your IPN URL.
Only verified projects can use our plugins or API requests.
You can check your project verification status in the Projects => Project list section of the Payop admin panel.
Furthermore, once your application is verified, you should receive a notification at your registered email.
If the issue persists even though your project status is `Accepted`, please contact our support team via Tickets.
Unfortunately, we currently do not have any sandbox or test environment. We hope these features will be available soon.
To test your integration, you can make a live payment, indicating a minimum amount possible to receive a successful transaction or cancel the transaction when entering the payment details. In this case, you will receive a notification about the payment cancellation.
If a transaction is successful or failed, you should receive an IPN callback to the IPN URL, which has been indicated in the IPN section of the Payop admin panel.
You can test your IPN URL using Postman (or any other API testing environment).
To do so, we recommend you send a POST request indicating your IPN URL as an endpoint.
An empty JSON object or example IPN callback can be indicated in the request body to troubleshoot your IPN URL service.
If you made a live payment, you can contact our support team via Tickets. They will resend an IPN callback and assist with troubleshooting your IPN URL service.
The Test checkout sub-section allows you to preview the payment page your customers will see, create an invoice, and test the checkout process.
If you want to see the checkout page for a particular payment method, select it in the Payment method field. Otherwise, if you want to view the general checkout with all available methods, keep the default All payment methods selected.
If you have several websites, in the Select project field, choose the one you want to use for the test.
Amount, Order ID, and Currency details are pre-defined, so you can proceed with the test using this data or modify it if needed.
Then, you click the Show payment page button and are redirected to the Checkout page.
You can also change the checkout page language and country at the top of the page. Usually, those values are defined by the payer`s browser language and location. However, page language can be changed by entering the {{locale] value in the checkout page link https://checkout.payop.com/{{locale]/payment/.
Alternatively, you can use the API to generate an invoice and a link to the Checkout page.
A certificate is required to create a mass-withdrawal request and to ensure it will be processed securely:
Create Mass Withdrawal · Payop/payop-api-doc
It can be generated in Settings => Certificate section.
As a result, a `stream` file will be downloaded to your device.
It contains an encoded binary string.
You can find information on how to use a certificate here:
Create and Encrypt Withdrawal Payload · Payop/payop-api-doc
If a certificate has been compromised, we strongly recommend you contact our support team via Tickets.
JWT token is needed in requests where additional authentication is required to ensure the security of the sensitive information being passed via API request or received via API response.
You can generate it in your dashboard:
1. Navigate to the "Settings" section
2. Locate the "JWT Tokens" tab
3. Click on "Add New Token" and follow the on-screen instructions
4. Please keep in mind that all JWT Tokens should be created with an expiration date.
There are 2 types of JWT tokens available:
With IP whitelist: This token provides increased security by allowing you to restrict usage to specific IP addresses. Note that the whitelist cannot be modified once created, so you'll need to generate a new token if your IP address changes. We highly recommend choosing this option.
Without IP whitelist: Standard JWT token without IP whitelist.
As a result of token creation, you will get a string in the following format: "token": "xXXxx0X00…."
In your requests, you should use only the token`s value.
If a JWT token has been compromised, we strongly recommend deleting it and creating a new one.
Please check the short video guide by following the link.
Once the payment is processed and gets its final status (Accepted or Rejected), you will receive an IPN notification to the specified URL. You can also check the payment statuses in the `Transactions` section of your account.
There are two ways you can check the availability of payment methods for your project.
1) Go to the `Payment Methods` section of your admin panel and choose the project for which you want to check the enabled methods with the applied fees.
2) Make an API request for more details like payment method ID, type, and supported countries.
Get Available Payment Methods · Payop/payop-api-doc
Please be advised that there is a wide range of API testing tools (e.x. Postman, REST-assured, JMeter, Curl, etc.) to make API requests and receive information, you need to choose the most convenient for you.
Step-by-step video instruction: How to find available payment methods for application/project | Payop.
If you want to add a payment method that is not available for your application now, please contact our Support team via email at support@payop.com or our Ticketing system. They will clarify your request with the relevant department. If enabling the requested method for the project is possible, our team will make the necessary adjustments.
In case a certain method is not relevant for your customers, you may deactivate it in your merchant account:
- go to the Payment Methods section;
- find the needed method using the Search field;
- disable it using On/Off toggle.
You can always contact our technical team for any technical questions or issues. To help us investigate and reproduce the issues you are experiencing, we ask that you provide us with the following information:
- browser version
- IP address
- connection type
- time and date the issue occurred
- screenshots* or video recordings showing the issue (Error codes and messages / API response)
- your steps to reproduce the issue
- test access to your site (if it`s restricted)
- URL request (Right-click on the error request in the DevTools => Copy => Copy as cURL (cmd))
- for the issues related to the Payop admin panel, your user session (Browser Devtools => Application => Local Storage => Payop => user-session value (please copy the value).
- logs or API responses on your side, if any.
- for the integration-related issues, the body of your API request
*We recommend providing screenshots with the developer console enabled to see the error message and headers. (F12 (DevTools) => Network tab => Click on the error request).